Pytest单元测试框架
单元测试
单元测试是指在软件开发中,针对软件的最小单位(函数、方法)进行正确性的检查测试
单元测试的作用
- 1、测试发现:从多个文件里去找到测试用例
- 2、测试执行:按照一定的顺序和规则去执行,并生成结果
- 3、测试判断:通过断言判断预期结果和实际结果的差异
- 4、测试报告:统计测试进度,耗时,通过率,生成测试报告
自动化测试框架
自动化测试框架的作用
- 提高测试效率,降低维护成本
- 减少人工干预,提高测试的准确性,增加戴拿的重用性
- 核心思想是让不懂代码的人也能通过这个框架实现自动化测试
pytest单元测试框架和自动化测试框架的关系
单元测试框架是自动化测试框架中的组成部分之一
pytest简介
插件
- pytest-html 生成html格式的自动化测试报告
- pytest-xdist 测试用例分布式执行,多CPU分发
- pytest-ordering 用于改变测试用例的执行顺序
- pytest-rerunfaliures 用例失败后重跑
- allure-pytest 用于生成美观的测试报告
安装
pip install pytest***使用pytest默认规则及基础应用
- 模块名必须以test_ 开头或 _test 结尾(文件名)
- 测试类必须以Test 开头,并且不能有init方法
- 测试方法必须以test 开头
pytest测试用例的运行方式
主函数模式
运行所有
if __name__ == '__main__':
    pytest.main()  #pytest.main(['-s'])
运行指定模块
if __name__ == '__main__':
    pytest.main(['-vs','test_login.py'])
指定目录
if __name__ == '__main__':
    pytest.main(['-vs','./test_login.py'])
执行某个函数
if __name__ == '__main__':
    pytest.main(['-vs','./test/test_login.py::test_login']) #执行test目录下test_login文件中的test_login函数
执行某个类的方法
if __name__ == '__main__':
    pytest.main(['-vs','./test/test_login.py::TestLogin::test_login']) #执行test目录下test_login文件中的Test类中的test_login方法
执行方法一定要固定位置,其他运行参数必须在以上这两个参数之后才能执行成功
命令行模式
运行所有
在项目所在位置打开终端执行以下命令:
pytest运行指定模块
pytest -vs test_login.py指定目录
pytest -vs ./test_login.py指定函数
pytest ./test/test_login.py::test_login指定类中的方法
/test/test_login.py::TestLogin::test_login参数详解
-s : 表示输出调试信息,包括print打印的信息
-vs: 输出print信息的同时输出相应类名模块名
-n 支持多线程或分布式运行测试用例
-reruns NUM: 失败用例重跑
-x: 只要一个用例出错,测试就停止
–maxfall 2: 用例失败2个就停止测试
-k: 根据测试用例的部分字符串指定测试用例 pytest -vs ./testcase -k ‘ao’ 执行所有带有ao字符串的函数
通过读取pytest.ini配置文件运行(常用)
pytest.ini 文件时pytest单元测试框架的核心配置文件
- 位置:放在项目的根目录(与测试用例同级)
- 编码:必须是ANSI,可以使用notpad++修改编码格式(菜单栏编码 )
- 作用:改变pytests默认的行为
- 运行的规则:不管是主函数的模式运行,命令行模式运行。都会读取这个文件
pytest.ini
[pytest]
#命令行参数
addopts = -vs --color=yes
#测试用例的路径
testpaths = ./testcase
#模块名的规则
python_files = test_*.py
#类名的规则
python_classes = Test*
#方法名的规则
python_functions = test
运行
pytest #要在测试用例存放的目录下运行分组执行(冒烟、分模块执行、分接口和Web执行)
testcase/test_login.py
import pytest

@pytest.mark.smoke
def test_login():
    print('hhhhh')
@pytest.mark.usermanager
def test_logout():
    print('ashkdhas')
testcase/test_action.py
import pytest

def test_action1():
    print("asdjiaj")
@pytest.mark.smoke
def test_action2():
    print("asdhukuash")
pytest.ini
#加上以下语句
markers =
   smoke:冒烟用例
   usermanager:用户管理模块
   productmanage:商品管理模块
执行
pytest -m "smoke"  #执行somke函数 test_action2()&test_login()
pytest -m "usermanager" #执行usermanager函数 test_logout()
pytest -m "smoke or usermanager"  #执行以上所有
pytest执行顺序
pytest默认从上到下执行,改变默认顺序要使用mark标记。
@pytest.mark.run(order=3) #order为执行次序pytest跳过执行
@pytest.mark.skip(age<18,reason='未成年')  #age为已经定义的变量,有条件跳过
@pytest.mark.skip(reason="未成年")   #无条件跳过
执行
pytest导出html报告
安装
pip install pytest-htmlpytest.ini
在根目录新建一个report目录,在pytest.ini文件中加入下列语句
addopts = -vs --html ./report/report.html #html存储路径pytest实现前后置(固件、夹具)
前后置的作用
eg. Web自动化执行用例之前,需要打开浏览器,执行后需要关闭浏览器,这些功能由前后置实现
setup/setup_class/teardown/teardown_class(所有用例)
class Testcase:
    #在该类所有用例之前只执行一次,在每个类执行前的初始化工作,比如创建日志对象、创建数据库链接、创建接口的请求对象
    def setup_class(self):
        pass
    #在每个用例之前执行一次,在执行测试用例之前初始化代码:打开浏览器,加载网页
    def setup(self):
        pass
    def test_login(self):
        pass #必须要有此方法,否则不会执行此类
    #在执行测试用例之后的扫尾代码:关闭浏览器
    def teardown(self):
        pass
    #在每个类执行后的扫尾工作,比如销毁日志、销毁数据库的连接、销毁接口的请求对象
    def teardown_class(self):
        pass
@pytest.fixture
使用@pytest.fixture装饰器来实现部分用例的前后置
- scope 表示被@pytest.fixture标记的方法的作用域,默认作用域于function,还可作用于class/module/package/session
- params 参数化
- autouse=True 自动化执行 默认False
- ids:当使用params参数化时,给每个值设置一个变量名,意义不大
- name: 给被@pytest.fixture标记的方法取一个别名
部分用例前后置
@pytest.fixture(scope="",params="",autouse="",ids="",name="")
def my_fixture():
    #前置方法
    print("前置")
    yield
    #后置方法
    print("后置")

class Testcase:
    def test1(self): #没有前后置
        print("test1")
    def test2(self,my_fixture):  #拥有前后置方法,如果设置autouse=True则失效
        print("test2")
输出结果
test1
前置
test2
后置
全部用例前后置
作用于函数
在每个函数的前后执行
@pytest.fixture(scope="",autouse=True)  #autouse=True应用于全部
def my_fixture():
    #前置方法
    print("前置")
    yield
    #后置方法
    print("后置")
class Testcase:
    def test1(self):
        print("test1")
    def test2(self,my_fixture):
        print("test2")
输出
前置
test1
后置
前置
test2
后置
作用于类
在每个类的前后执行
@pytest.fixture(scope="class",autouse=True)  #autouse=True应用于全部
def my_fixture():
    #前置方法
    print("前置")
    yield
    #后置方法
    print("后置")
class Testcase:
    def test1(self):
        print("test1")
    def test2(self,my_fixture):
        print("test2")
输出结果
前置
test1
test2
后置
作用于模块
在模块(py文件)前后执行
@pytest.fixture(scope="module",autouse=True)参数化
@pytest.fixture(scope="function",params=['测试1','测试2'])
def my_fixture(request):
    #前置方法
    print("前置")
    yield request.param #固定写法 return和yield都表示返回,但是return后面不能有代码,yield返回后可以接代码
    #后置方法
    print("后置")
class Testcase:
    def test1(self):
        print("test1")
    def test2(self,my_fixture):
        print("test2")
        print(str(my_fixture))  #传递参数
输出结果
test1
前置
test2
测试1
后置
前置
test2
测试2
后置
全局的前置应用
通过conftest.py和@pytest.fixture()结合使用实现全局的前置应用:
- 项目的全局登录
- 模块的全局处理
在测试用例文件夹(testcase)下创建一个conftest.py(固定命名) 文件,可在不同的py文件中使用相同的前后置(fixture),conftest.py的内容如下
@pytest.fixture(scope="function",params=['测试1','测试2'])
def my_fixture(request):
    #前置方法
    print("前置")
    yield request.param #固定写法 return和yield都表示返回,但是return后面不能有代码,yield返回后可以接代码
    #后置方法
    print("后置")
其他模块中使用fixture直接调用my_fixture即可
def test_login(my_fixture):
    print(str(my_fixture))
多个测试用例可以在与测试用例同级文件夹下创建conftest.py文件,定义不同的fixture函数,在当前测试用例中调用函数名即可
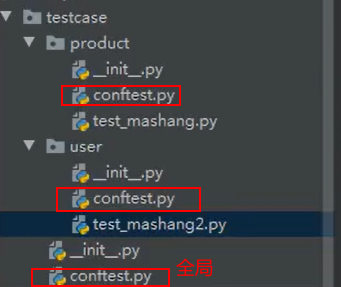
上图中最后一个conftest.py文件为全局文件,其余分别为product/user的前后置文件,在test_mashang.py中使用
def test_login(all_fixture,user_fixture):  #all_fixture为全局前后置函数,必须放在user_fixture之前传入
    print(all_fixture)
    print(user_fixture)
向fixtrue传参
@pytest.fixture
def my_fixture():

  def _method(a, b):
    return a*b

  return _method

def test_me(my_fixture):
  result1 = my_fixture(2, 3)
  assert result1 == 6

  result2 = my_fixture(4, 5)
  assert result2 == 20
断言
在需要中止的测试函数中加入以下语句
assert 1==2 此函数在测试执行时就会失败,不进行测试
allure测试报告
安装顺序不能错
1.安装插件
https://github.com/allure-framework/allure2/releases
在上面地址下载zip包并解压,并将解压包的bin文件夹设置为系统环境变量Path。cmd验证是否成功添加:
allure --version环境配置出错
首先cmd要能正常运行java javac
- 系统变量->新建->变量名JAVA_HOME,变量值xxx\jdk1.8.0_221(自己的jdk安装目录)
- 系统变量->新建->变量名CLASSPATH,变量名为%JAVA_HOME%\lib; (要有分号)
- 系统变量Path->编辑->输入 %JAVA_HOME%\bin;
- 系统变量Path->编辑->输入 xx\jdk1.8.0_221\bin(不能加分号)
- 重启cmd
2.在pycharm中安装
pip install allure-pytest在Pycharm 终端执行:
allure --version正常运行则说明安装成功。
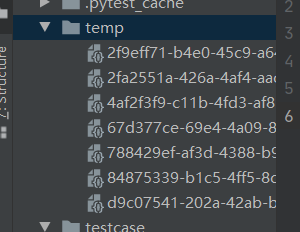
2.生成json格式的临时报告
conftest.ini
#在配置文件中加入以下语句
[pytest]
addpots = -vs --alluredir ./temp
运行后生成如图所示的文件夹
3.使用主函数模式运行测试用例
在与测试用例同级的目录下创建一个test_main.py文件
test_main.py
import os
import pytest
if __name__ == '__main__':
    pytest.main()
    os.system('allure generate ./temp -o ./report --clean')
参数解释
- allure generate 固定语法
- ./temp 找到json目录
- -o ./report output输出到report目录下
- –clean 清空原有的报告目录(json目录)
自定义allure
PO设计模式
- Page Object:页面对象化,把一个页面的测试用例、测试逻辑,封装为一个测试或测试类
实现
import allure
@allure.feature("项目名称")
class Test:
    @allure.story("测试用例名称")
    @allure.description("测试用例描述")
    @allure.title("账号不存在")
    @allure.step("")
    def test_test1(self):
        pass
        with allure.step("打开页面"):
            allure.attach("1161","用户名")
            #打开页面的代码
@pytest.mark.parametrize()数据驱动
参数解释
@pytest.mark.parametrize(args_name,args_value)- args_name 参数名
- args_value 参数值(列表、元组、字典列表、字典元组),有多个用例就会执行多少次
使用
import pytest
class TestApi:
    @pytest.mark.parametrize('args',['zby','ybz'])
    def test_login(self,args):  #参数名
        print(args)
输出
zby
ybz
import pytest
class TestApi:
@pytest.mark.parametrize('name,age',[['zby',16],['ybz',20]])
def test_login(self,name,age): #参数名
print(name,age)输出
zby 16
ybz 20
YAML文件实现接口自动化
YAML文件功能
- 用于全局的配置文件 ini/yaml
- 用于写测试用例(一般用于写接口测试)
yaml简介
yaml是一种数据格式,支持注释、换行、多行字符串、裸字符串(整型,字符串)
语法规则
- 区分大小写
- 使用缩进表示层级,不能使用tab键缩进,只能使用空格
- 缩进没有数量的,只要前面是对齐就行
- 注释符号为#
数据组成
使用 https://www.bejson.com/validators/yaml_editor 进行数据格式转换
Map对象
键值对:
key:(空格)值
user:
   name: zby
   age: 18
或
user:
{name: zby,age: 18}
数组
 #对齐的横线就是数组
 -
  user:
    - name: zby
    - age: 18
 -
  cutomser:
     -id: 1
或
-
  user: [{name: 'zby'},{age: 18}]
yaml与python结合使用
安装
pip install pyyaml使用
在测试用例文件夹下新建一个py文件
yaml_util.py 读取yaml文件
import yaml
class YamlUtil:
    #传递yaml文件
    def __init__(self,yaml_file):
        self.yaml_file = yaml_file

    #读取yaml文件
    def read_yaml(self):
        with open(self.yaml_file,encoding='utf-8') as f:
            value = yaml.load(f,Loader=yaml.FullLoader) #对yaml进行反序列化,就是把
            return value
test_api.yaml,设置测试用例规则
#用例1
-
  name: 测试test
  #设置http请求
  request:
    url: http://127.0.0.1:8000/test
    method: get
    headers:
      Content-Type: application/json
  #断言 可分为业务断言与状态断言
  validate:
    - eq: {ret: 1}
#用例2 不用重构代码,直接对yaml文件进行操作即可进行操作
test_api.py,对测试返回的结果进行处理
import pytest
import requests
from testcase.yaml_util import YamlUtil

class TestApi:
    @pytest.mark.parametrize('args',YamlUtil('./testcase/test_api.yaml').read_yaml()) #如果使用主函数模式运行测试用例,yaml文件路径必须是相对main函数所在文件的相对路径
    def test_login(self,args):  #参数名
        #args为yaml文件内容的字典格式,如下图
        print(args)
        url = args.get('request').get('url')
        res = requests.get(url)
        print(res.text) #响应消息体